
It is my special pleasure and honour today to not only share a new tutorial with you but wish all our true players and readers and That Craft Place friends a happy new year and all the best for a successful 2015 on behalf of the whole TCP team!
(and of course this is a great opportunity for me to wish my lovely boss Lisa, fabulous Danny and all my wonderful teamies all the best for 2015 too ;)
There's also a new challenge to join in! Just click HERE to learn more about it. (but you can also read to the end of this post first and then find the link to the challenge at the bottom of it again ;).
***


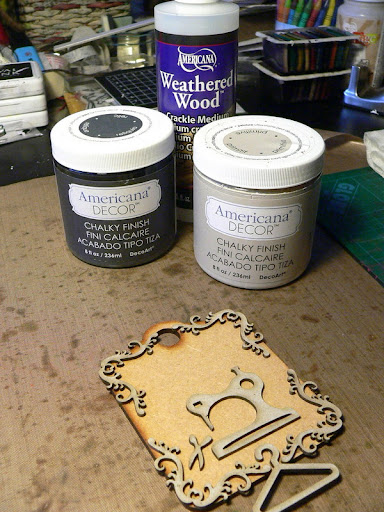
You will need:

...one of the great MDF tags from the tags set, a cameo and some white gauze alongside ...

...a hanger, four lovely corner elements and a sewing machine to arrange them like this:

Then you treat the assembled plaque with the following media:
- DecoArt Americana Decor Chalky Finish paints: relic, primitive, heritage, rustic and smitten
- DecoArt Americana Weathered Wood
- DecoArt Americana Decou-Page "Fabric"
Additional materials needed:
- some letter stamps and white card
- dark brown archival stamping ink
- Distress ink "gathered twigs" and blending tool
- glue, scissors, soft flat brush, kitchen roll
All of this (and more) can be found at That Craft Place - find the links to go shopping at the side bar!
Step 1
First you choose two dark tones of the chalky finish paints to use with the Weathered Wood. I used "relic" underneath "primitive" as they contrast each other quite beautifully.
I am always amazed by how delicate the chalky finish paints look once they have dried:

Next apply a coat of Weathered Wood crackle medium. I recommend you use a soft brush and rather stipple the paints and medium onto the plaque than brush them so you really get into all the tiny spots!
Once the Weathered Wood has dried to the touch apply the lighter tone of the chalky finish paint. I stippled that paint too. Don't go over the same areas too often and don't use much pressure when doing brush strokes as this will smudge and stop the medium from forming proper cracks.
Then watch the Weathered Wood and the Chalky Finish paints do their magic!

Once all has dried glue on the cameo. Then get ready for dry brushing ;)
Step 2
Get a piece of kitchen towel ready and use a soft wide brush for this step. Work from lightest to darkest tone. I used DecoArt Chalky Finish paints "heritage", "rustic" and a final touch of "smitten" to blend in the cameo.
To dry brush load only the tip of your wide flat soft brush with a hint of Chalky Finish paint and then "paint" the kitchen towel with it until there is hardly any paint left.

What's left on your brush afterwards...that's the amount of paint needed for dry brushing!
Gently brush that "paint residue" over all the edges and raised areas of the glued on pieces until the outlines and/or texture become well visible. Change directions while dry brushing and also turn your brush. It is better to repeat the steps more often than using more paint (as too much paint on your brush will create visible brush strokes which will spoil the subtle effect of the dry brushing).
I have taken images of the same spot in between the single dry brushing steps so you can see the progress and effect each layer creates.
Before first dry brushing layer:

After dry brushing with "heritage":

After dry brushing with "rustic":

After blending in the cameo by dry brushing a hint of "smitten" onto some of the raised areas of the glued on pieces:

And this is what you will come up with once the dry brushing is done:

Step 3
Cut to size a little piece of gauze, flap it over the hanger and glue it together using the Decou-Page "Fabric" glue that will keep the fabric flexible but will prevent it from fraying and will also hold the stamped word tiles in place.

I dry brushed some "smitten" chalky finish paint onto the fabric as well.

Then I stamped and cut out my words, blended the edges with DI "gathered twigs" and glued them in place.

Don't use Distress ink for stamping your words - otherwise the Decou-Page will make them smudge and smear.

Step 4
Add a piece of ribbon that matches the colours used on your door hanger - you're done!

I hope you like my vintage sewing room door hanger!

***
Happy new year to you all and may 2015 bring a lot of crafty joy and adventures!
Hugs and happy crafting,
Claudia xxx


