
Claudia here and before I start with today's tutorial, I want to thank you all so much for all the lovely comments on my previous tutorial on this blog.They really mean a lot to me and fuel my creativity! And I also want to remind you about our actual challenge! It is still open for some more days ;)
If you want to know who won the last challenge, click HERE.
I always love working with Lisa's fab MDF laser cuts (as I love their bulkiness and lightness at the same time) and the media she sells at her store and hope I will be able to provide you with some inspiration for possible future X-mas projects today.
So consider this a technique tutorial rather than a whole project tutorial today, as I only concentrated on the image transfer and on achieving a really delicate and worn but yet festive look like this:


I chose one of these fab MDF panels (the ones in the bottom right corner) and decided to prepare it for a X-mas project that hasn't yet formed completely in my mind...but I am almost sure I will be using it on a shabby chic altered box (which would make a lovely X-mas present, right?) But you can use this technique for customizing chipboard or other laser cuts of course. I am sure there are tons of projects to use them on ;)

For a start I covered the panel with two layers of DecoArt Americana Chalky Finish paint "lace" and let each dry thoroughly. Then I sanded the surface lightly (using a really fine grid) - this was to prepare the surface for the image transfer I will show you in the next steps...

Then I sealed the panel with a thin coat of Decou-page.
For my image transfer I had chosen a lovely mistletoe picture from a home decor magazine. You can see it to the right (roughly torn to size).

The DecoArt Americana Transfer Medium was applied to both - the substrate (=painted panel) and the picture from the magazine - with a soft brush. While still wet, I placed my mistletoe picture face down on the panel and pressed and smoothed out any air bubbles or creases with my fingers.

I also tore some paper off the edges instead of aiming for a close fit with the edges.


Then it was left to dry for about two to three hours.
Instructions on the pot advise to let it sit for eight hours...which I would definitely recommend if you want a perfect and clean image transfer. But as I was aiming for something a bit worn and shabby I began removing the back layer of the magazine page a lot earlier.
I knew that some of the image would very likely come off by doing so - but that was exactly what I wanted for a shabby effect.
To remove the back of the glued on magazine page, I generously spread warm water with a soft brush over it and let it soak in. Then i started to gently rub the paper with my fingertip. As you can see the paper starts coming off in wet tiny crumpled pieces.

Watering and rubbing....watering and rubbing....it takes a bit of patience, but I love when the transferred image starts to show!

See? There it is - my mistletoe image! Yay! You can also see some white spots. That's where the image came off - due to the (too) short drying time of the Transfer Medium and/or my rubbing too hard. But as I had also torn the image off around the edges instead of trying to create an exact edge that followed the panel's shape, this was a perfect match!
I let the panel dry and sealed the surface with a thin layer of DecoArt matte Decou-page. You can use Mod Podge or any other sealant instead - but the matte Decou-Page is my personnal favourite as it dries incredibly fast!
After that had dried (incredibly fast), I applied some DecoArt media Crackle Glaze to the panel with a soft brush. As the Crackle Glaze is self-levelling, this is a very easy job to do. Then I had to be patient (Oh dear! Poor me!) and let it air dry!!!!

As you can't see much of the delicious crackle at that stage (even though it is there. Promise!) you have to "fill" the cracks with paint (which in my case was Raw Umber DecoArt Antiquing Cream) and wipe off the excess. This will make all the lovely creases visible.

The Antiquing Cream is great stuff as you can leave it to get fully dry and still wipe off as much of it as you wish. Don't start wiping off too early and don't use baby wipes as they tend to take colour from the creases as well as long as it is still wet...I used a slightly damp soft cloth instead.
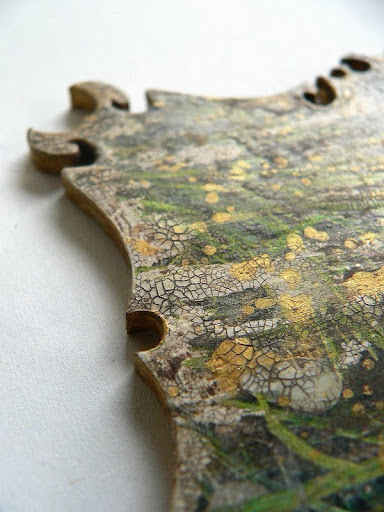
This is the result:


For a finish I painted the sides with DecoArt media metallic "Gold" and also sprinkled some diluted gold paint onto the panel using a loaded brush.

Well, that's it so far. The finished panel is ready to be used on a future project...maybe an altered box, maybe some tree ornament, maybe a X-mas card. I don't know yet.

I hope you like it and give this wonderful technique a try! It's definitely worth it!
I leave you with the materials list and hope you have enjoyed Von Pappe Wednesday! Hope to see you soon! And don't forget to join in our actual challenge! There's still some time left ;)
Have fun!
Hugs and happy crafting,
Claudia xxx
Materials used:
- MDF Laser Cut Panel (exclusive design from That Craft Place)
DecoArt stuff:
- Americana Decor Image Transfer Medium
- Americana Decor Chalky Finish paint "lace"
- Decou-Page (matte)
- media fluid acrylic "Gold"
- Antiquing Cream "Raw Umber"
- media Crackle Glaze
Go shopping:
http://www.thatcraftplace.co.uk/
That Craft Place on facebook

Great idea, many thanks for the detailed tutorial!! Hugs,Kerstin x
ReplyDeleteI'm supposed to be on a spending freeze right now, but I so want to try this technique. Fab tutorial!
ReplyDeleteAMAZING Claudia!
ReplyDeleteOh boy that was a rollercoaster of a tutorial. Every time you applied a different layer I wondered what would happen and by the end it looked superb! One of the best versions of image transfer I've seen. Jenny x
ReplyDeleteBeautiful. Great and clear instructions too. Thanks for sharing.
ReplyDeleteIt's gorgeous... what a beautiful effect with the tiny little cracks!
ReplyDeleteI love the transferring have never tried it will have to have a go crackle glaze looks amazing.
ReplyDeleteThat's just amazing, love the finished look.
ReplyDeleteSieht total genial aus Claudia, dieses Motif mit dem Mistelzweig ist so schön. Tolle Technik dieses Krackelierte, gibt einen tollen Oldieeffekt.
ReplyDeleteLiebe Grüße
Sabine
Wow!! This is such a wonderful idea and thank you for all the helpful hints throughout your tutorial. I would love to try this transfer technique. And that Antiquing Cream ... so cool. Gorgeous plaque. -- Mary Elizabeth
ReplyDelete