
And you're just in time to also check out the brand new challenge "Film (Inspired)" that started this Sunday and get inspired by the brilliant makes of the fab TCP team (over HERE)!
Today I have a rather short (and easy to follow) tutorial for you that will show you how to create a Steampunk door sign that will tell visitors to "keep out". (My son has just reached that certain age where kids need to keep their annoyingly protective (and curious) parents from uninvitedly entering their rooms...lol...so that was my main source of inspiration this time).

Lisa sells some really fab Steampunk chipboard and MDF wood cut pieces and I chose to use some of these for my door sign:

As you can see I have used pieces from the tiny houses and arrows and the "Mixed Bag of Gears" grab bags this time alongside her wonderful chipboard panel with the gears and cogs frame.
I love the MDF Laser Cuts because they are heavenly bulky and lightweighed at the same time! So when you "steam them up" they look really massive and heavy - like real metal pieces.
For the door sign I also used:
- DecoArt Metallic Lustre "Copper Kettle"
- DecoArt Traditions acrylic paint "Raw Umber"
- DecoArt media fluid acrylic "Quinacridone Gold"
- DecoArt Decou-Page Satin
- some soft wire and pliers
- a stipple brush and a small soft paint brush
- a collection of various embellishments (metal and resin)
- a texture stamp (I used one of Andy Skinner's but any stamp that creates a scratched or splattered pattern will do as well)
- black archival stamping ink
- alpha parts or any other three dimensional letters
So you see: the list is rather short (and you can buy most of what you need for it with That Craft Place - either with the Online Store or the TCP facebook group...or in Lisa's lovely bricks and mortar shop of course) - which means: this is a really quickly done project. I promise! ;)
1. Start with adhering your alpha parts to the panel once you are content with the arrangement of all the MDF pieces and the "keep out". Then cover the whole panel and the letters by stippling a thick layer of Raw Umber acrylic paint all over them. Stippling will create a rough texture once the paint has dried - and we will need that!

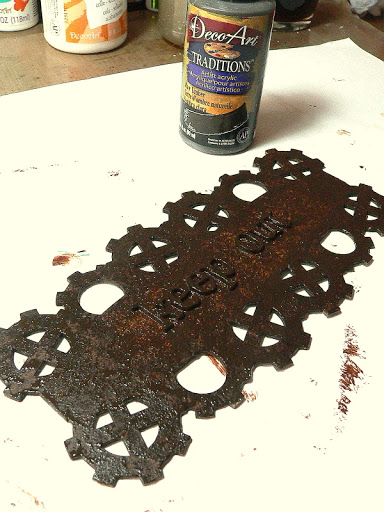
As you can see we will need a second layer of paint to make sure we have good coverage! But while the first layer dries move on to step 2...
2. Stamp a "rust" (or scratch or splatter) pattern onto the (untreated) MDF gears and arrows with black archival (!) stamping ink. Let dry.

In the meantime stipple on the second layer of Raw Umber before you move on to Step3!
3. Paint a thin layer of Quinacridone Gold over the dried stamped texture with a soft brush. This is the quickest way of creating a rusted surface look with minimum mess! Thanks to Mr. Andy Skinner!

4. And there's another brilliant invention I have seen Mr. Skinner demo at CHA this year: rusted looking nails heads made from card! It's fantastically easy: stamp some texture in black archival ink (as you did with the gears and arrows) onto some heavy card, paint them with the Quin Gold and punch out little circles once all is dry. Make sure you colour the circles' edges with a hint of black paint - voila: your nails heads are done!

5. Glue all your pieces in place and let dry. Then get out the Metallic Lustre (or any other gilding wax with a copper sheen) and rub it on with your fingertip. You will find that the stippled on paint texture will start to show and create the impression of a wonderfully weathered metal surface!

6. Cover the "keep out" with the Metallic Lustre too! Then browse your embellies stash to find some metal parts that fit your design and glue them to your door sign.

7. I also found a resin eye that needed a little alcohol inks treatment to help it blend in better....but that is just optional. You can embellish your door sign with whatever stuff you like - it's all up to you).

8. Cut to size a piece of soft black wire using pliers and attach it to your panel. I rubbed some Copper Kettle Metallic Lustre on the wire too to make it blend in.

As the wire is soft you can tweak it with your fingers until you are content with the loop's shape.

And that's it! You're done! Easy peasy - just as I had promised! Right? ;)

So I hope I could show you that it doesn't always take ages and loads of steps and different media to create something cool steampunk looking! So maybe I could even manage to lure some of you into steampunk as well - I would be very happy about that as steampunk can be so much fun! Of course the demonstrated technqiues can be adapted to any kind of style...but rusty looking surfaces done that easily might well open the gates to crafters who haven't dared approach that style by now. Who knows!
I leave you with some more images and close ups and say a massive "thank you for stopping by!"


Hugs and happy crafting!
And have fun shopping with That Craft Place and crafting with their fab stuff!
And make sure you don't miss their fun challenges either! There's such a brilliant bunch of talented ladies over there constantly sharing awesome inspiration! And I am so proud of being able to work alongside all of them!
Claudia
xxx
stunning fabulous.
ReplyDeleteGr Karin
So wonderful!!! Absolutely loved this tutorial and your fantastic keep out steampunk industrial sign. Thank you so much for sharing!
ReplyDeleteWow this looks supercool! I am sure your don will love it. I like the rusty nails from card, giving that a go. Hugs Jan x
ReplyDeleteA great tutorial Claudia and a great piece!
ReplyDeleteHello Claudia,
ReplyDeleteThe rusting and the hanger is amazing.
Smiles:)
Sue
Just perfect !!!!!!!!!
ReplyDeleteBisous
Just gorgeous Claudia!! thanks for sharing your steps!! xo
ReplyDeleteGorgeous and fabulous!!!
ReplyDeleteGreat rusty look to this. I need this for my creative space!
ReplyDeleteAWESOME Claudia!! OK--that eye, is really freaking me out!! But it's totally cool, too :) :) XOXO-Shari
ReplyDeleteLove this technique--thanks for the tutorial!
ReplyDeleteGreat tutorial Claudia, and fantastic work!
ReplyDeletethis looks fantastic i love love it!!...really want the Andy skinner rust stamps think they are a great idea!! :)
ReplyDeleteGreat fun piece Claudia, love the texture.
ReplyDeleteHappy crafting, Angela x
Love all the rusty goodness!
ReplyDeleteVery cool piece, Claudia. Love all of the rusty goodness and your arrangement of all of the laser cut pieces.
ReplyDeleteYour piece of art looks great. I love to work with acrylic paints and the rusty look.
ReplyDelete