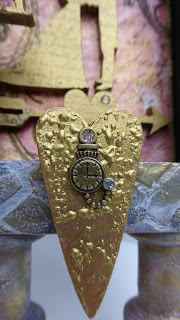
It's Angela here and I have a Tutorial on how to make
one of the gorgeous Mini Shrines from TCP.
You may remember this as I showed it to you in the challenge on 17th January and if you read Craft Stamper Magazine you will have seen it there too.
Today I am here to show you how I made it.

Here is where I began.
I hope you enjoyed watching me make this and would love it if you could leave a comment.
Any queries just ask! and I will try to answer them.
Happy Crafting,
Angela x
Don't forget our latest challenge is Here
one of the gorgeous Mini Shrines from TCP.
You may remember this as I showed it to you in the challenge on 17th January and if you read Craft Stamper Magazine you will have seen it there too.
Today I am here to show you how I made it.

Here is where I began.
Painted the pieces all over with Gesso to seal the MDF.
However try not to put too much in the joints as the fit is quite tight.
Next assemble and apply black paint on the inner edge, no need to worry about it getting on the back as this will be covered later.
Now apply Grunge paste through a stencil on the back and front of the Shrine and paint the other embellishments with Gesso (all available at TCP).
Mix together Micro Glass beads, acrylic paint and ink which will later be used to give added textured to the surface.
I used the same colours to produce the crackle effect on the wings.
Dark pink first, allow this to dry then add the crackle paste and when that's dry apply the paler pink and watch the fun happen.
Prepare the background paper by dragging it through ink on your craft mat and when dry stamp onto it with a sentiment stamp of your choice.
Here you can see that I have applied the colour and the glass beads ready for the final embellishments to be added.
And here it is completed.
Including a view of the back and sides which you will not have seen before.
I have also added a few pink gems for added sparkle.
I love this bubble effect which is easy to achieve by over heating the paint while still wet.
I hope you enjoyed watching me make this and would love it if you could leave a comment.
Any queries just ask! and I will try to answer them.
Happy Crafting,
Angela x
Don't forget our latest challenge is Here
Links you need to know


FAB project, thanks for sharing the details too
ReplyDeleteKathyk
A really clear and informative tutorial Angela. A good tip about adding the micro beads in with the acrylic paint. Your work is absolutely gorgeous. Barbxx
ReplyDeleteGreat tutorial, Angela! Love the angel wings! Your project looks gorgeous!
ReplyDeletePleased you enjoyed it ladies and thanks for the comments, Angela x
ReplyDeleteI have these clear micro beads and never thought to mix into my paint. Great tip and tutorial Angela.
ReplyDeleteHugs, Julie x