Hello and welcome, it's Julie here from Juliz Design Post sharing with you my first tutorial at That Craft Place. I was lucky enough to attend an Andy Skinner Workshop last year where I learned lots of different techniques. You will see many of them on You Tube. This keepsake box uses some of his techniques and inspiration of my own, so let's get started.
I have had this little box that measures approximately 3 x 6 inches in my craft stash for a while and just knew it would look amazing teamed up with products and Bespoke MDF from Lisa's shop.
I started by giving my box a sand to get rid of any rough edges and applied my paint with a square of Cut and Dry Foam, which gives a much smoother finish.
I prefer to apply a thin layer of this product with my finger rather than a brush. Be patient waiting on this drying as using a heat gun it can start to bubble.
Once dry I gave this a layer of varnish to seal the crackle.
The flat button from Creative Expressions I highlighted with a little Gilding Wax and added some red paint to my MDF word and glued both in place with Cosmic Shimmer Glue.
Now where the fun begins to make this box look aged. I brushed over with a very watered down mix of Paper Artsy's gold paint and dried with my heat gun.
I rubbed over my whole box with my anti static bag (this stops powder sticking where you don't want it to) and rubbed around the edges with an embossing ink pad. Adding a mix of gold and bronze embossing powders and heating setting in place. Next highlighting the edges with a little more red paint to define.
Next I pressed my embossing ink onto my MDF Hinges and added gold shades of embossing powder. I started to melt with the heat gun and kept adding and sprinkling Distress Powder in Vintage Photo and a Verdigris shade until I was happy with the result.
Finishing them off with a little black paint scuffed over the edges with a baby wipe.
Finishing them off with a little black paint scuffed over the edges with a baby wipe.
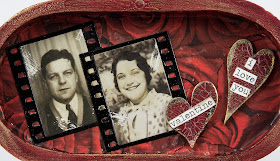
I used Craft Consortium's Red Roses Decoupage papers to line the inside of my box. My MDF Hearts were painted with the same red paint, I then added some embossing powder around the edges of the hearts in the same way I did the outer box. Next I added a layer of Deco Art Clear Crackle Glaze. Once dry I rubbed over with Deco Art White Antiquing Cream to highlight the cracks and added Ranger Chit Chat stickers.
My Cheery Lynn Photo Frames ( B673 Film Set ) were die cut out in Black Cardstock and heat embossed with clear powder to look like camera film. I used my scratchy tool on my Tim Holtz Lost Relatives photos to shabby them up.
The flat button from Creative Expressions I highlighted with a little Gilding Wax and added some red paint to my MDF word and glued both in place with Cosmic Shimmer Glue.
All the products used on my box are available at That Craft Place. I hope you enjoyed my tutorial and feel inspired to try out these techniques with the designs.
I would love if you have time to leave a comment.
Links you need to know:
I would love if you have time to leave a comment.
Crafty Hugs,
Julie x
Julie x


How beautiful, Julie! Love your crackled box and the colours you have used on it!
ReplyDeleteAbsolutely adorable!
Claudia xx
Gorgeous Julie, the crackle is gorgeous and I love that opulent colour . Tracy x
ReplyDeleteYour mega crackle turned out FABULOUS Julie - wow. You created a BEAUTIFUL box of AGED LOVE!!! What a treat to see. X j.
ReplyDeleteW-O-W!! Mega- crackle indeed and a fabulous box inside and out!! Chrisx
ReplyDeleteFabulous box Julie and a great tutorial x
ReplyDeleteAnother gorgeous piece Julie. Great tutorial too. Happy crafting, Angela xXx
ReplyDeleteFantastic tutorial Julie! Great design and such a wonderfully done job with all the paints and textures.
ReplyDeleteHugs
Samra
Wow, wow and wow again Julie! I LOVE Andy'd mega crackle technique and it looks perfect on your beautiful box. The roses decoupage paper looks fabulous inside and you have done a wonderful job of ageing your piece! Fabulous! Hugs, Anne xx
ReplyDeleteWow! This is gorgeous, Julie!
ReplyDeleteWonderful!!!!
ReplyDeleteSandy xx
Julie, that is so wonderful! Love the crackle on your box (and thanks for the finger painting tip for the Weathered Wood!) and the embossing around the edges looks amazing. The liner paper was perfect for your Valentine's themed box and love the crackled hearts and the wonderful pictures encased in the film strip dies. Just a wonderful keepsake box, thank you so much for sharing it! Deb xo
ReplyDeleteSuch a beautiful crackle effect, thanks for showing x
ReplyDelete