
Its DT Sandie Here and I have a Tutorial to share.
Today, I will show you step by step how I do basic short hair colouring with Spectrum Noir's.
It's the technique we are after here, so any markers will achieve the same effects just different colours.
The image I have used it Saturated Canary by Little Darlings Rubber Stamps Creative.

Today, I will show you step by step how I do basic short hair colouring with Spectrum Noir's.
It's the technique we are after here, so any markers will achieve the same effects just different colours.
The image I have used it Saturated Canary by Little Darlings Rubber Stamps Creative.

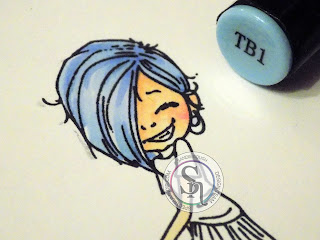
Start with a layer of your lightest colour just to get some colour on the page. I always use a flicking motion from the parting and down the hair


Now, flicking motions from the parting again I add small flicks of my darkest colour.
Add a little from the bottom too where the hair overlaps itself, this will depend on your image as to where and how much
Add a little from the bottom too where the hair overlaps itself, this will depend on your image as to where and how much

Now do the same again but with the midtone colour. Flick out a little more than with the darkest colour so it covers more of the pale areas.
You can see how it is starting to come together and have a little depth.

You can see how it is starting to come together and have a little depth.

Now back to the darkest colour and more flicks. This is because the darkest colour will have blended a little and lost its definition in the darkest shadowed areas of the hair.
I have used bullet nibs on my markers here as I know a lot of crafter's don't have brush nibs, so I am a little out of practice. Brush nibs will really help you get a very fine line of colour with the flicks but...its totally personal preference. All over hair strand definition you will also come across is one way of colouring hair, this is another more block method for basic colouring :D


Right, I'm off to start the clothing and I'll be back to share how I do the pleats on her skirt in a couple of weeks right here with That Craft Place.
Thank you for popping by xxx
I have used bullet nibs on my markers here as I know a lot of crafter's don't have brush nibs, so I am a little out of practice. Brush nibs will really help you get a very fine line of colour with the flicks but...its totally personal preference. All over hair strand definition you will also come across is one way of colouring hair, this is another more block method for basic colouring :D

Then, last step. Take a dark tone colouring pencil, I have used Spectrum ColorBlend Marine Blue, and blended in the darkest areas and then used a white to add highlights.

Thank you for popping by xxx
Don't forget our latest challenge is HERE
Links you need to know
fabulous step by step thanks for sharing looking forward to pleats
ReplyDeleteMaggieH
Thanks for a great tutorial, I shall certainly be giving it a go.
ReplyDeleteHugs Christine