Followers

Showing posts with label VonPappe Wednesday. Show all posts

Wednesday, 24 June 2015

VonPappe Wednesday #7

Servus and welcome back after an unforgivable long break to another VonPappe Wednesday!

Lovely Lisa - the owner and busy bee of That Craft Place - has the most wonderful range of laser cut MDF bits and pieces and this time I want to show you how to create this grungy frame with a bit of bling:


As you can see I originally thought of using one of her lovely bird shapes along with it, but during the process that idea got lost...lol

The list of materials I used can be found at the bottom of this post. All media and items I used can be bought at That Craft Place - either the bricks and mortar shop, the facebook group or the online store.

For a larger view simply click on the images.


Steps 1 and 2:

Give the frame a coat of white DecoArt media Gesso. Once that has dried, put a layer of DecoArt media fluid acrylic Titan Buff on top. 
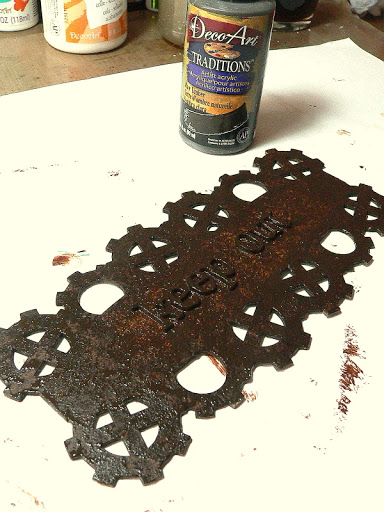


Step 3:

Using DecoArt Carbon Black media fluid acrylic paint stamp on some cracks. To do so spread some of the paint flat out on a palette or non stick crafting sheet and dab the stamp into the paint. Remember to clean the stamp immediately after use with soap and water as the acrylic paint can't be removed once it has dried! Using acrylic paint for stamping adds a little extra texture (but you can of course use archival stamping ink instead).


Step 4:

Rub and dab on some DecoArt media Texture Sand Paste using your fingers. Leave out the stamped areas. Let dry.


Steps 5 and 6:

Apply a wash of DecoArt media Transparent Yellow Iron Oxide fluid acrylic in random places and especially onto the areas with the Texture Sand paste. A wash means you generously apply heavily diluted paint (almost more water than paint).

If you find that you want your paint to puddle and run even more you can also add water directly with your brush to the spots where you have already added paint to. Dab off and/or add paint as you carry on until you are content with the effect.


Repeat the procedure with DecoArt media English Red Oxide fluid acrylic.


Step 7:

After that has dried thoroughly dry brush on some DecoArt media Paynes Grey  using a dry (!) wide flat soft brush. Only load the very tip of your brush and "paint" a piece of kitchen roll so there's only little paint left on your brush - gently brush that onto the textural areas and the edges of your frame. This will tone it down and also make any texture more visible.


Step 8: 

Add some DecoArt media Cobalt Turquoise Hue in various spots.


Step 9:

Next add the brighter DecoArt media Cobalt Teal Hue in the same spots to create a kind of patina look.


Right now your frame should already have turned from rather bright to grungy dark and worn looking.


Step 10 (is optional for those who really want their frame to look grungy and dark):

be brave and randomly scrape on some DecoArt media black Gesso with the smallest palette knife you have!


This will add more depth and detail to your frame! Don't be afraid of covering up what's underneath. Layering techniques are all about letting go ;)


Step 11:

For a finishing touch embellish your frame with some thin rough string and a pendant. I coloured mine using Ranger Alcohol Inks.


You're done!

Instead of putting an image behind your frame you could also fix a smaller panel with four holes in its corners with some string that you attach to four spots of your frame....or maybe even do both sides of the frame and attach some moveable parts to its centre and create a mobile....the possibilities are endless.


Materials list:

- That Craft Place Ltd. MDF laser cut frame

- DecoArt media products:
  * fluid acrylic paints: carbon black, titan buff, transparent yellow iron oxide, english red oxide, paynes grey, cobalt turquoise hue, cobalt teal hue
  * gesso: black and white
  * specialty media: Texture Sand Paste

- non stick craft sheet
- crackle stamp
- small palette knife
- wide tip soft brush
- kitchen roll
- Ranger alcohol inks: Stream, Juniper
- thin rough cord
- pendant


The actual challenge "Layers" which is an "all crafts challenge" this time, has just started! Why not check out the fab projects of the DT and play along?!!!

Hugs and happy crafting,
Claudia xxx


Wednesday, 11 March 2015

VonPappe Wednesday #6

Servus and welcome to another VonPappe Wednesday!

If you don't know what "VonPappe Wednesday" is: once per month - on a Wednesday - I am sharing a tutorial over here on the That Craft Place challenge blog in which I show you how to create something grungy, quirky, whimsycal, steampunk-ish, artsy,.....with the stuff lovely Lisa sells at her online and bricks and mortar shop.

I especially love to work with the MDF laser cut pieces she does as they are heavenly bulky and lightweight at the same time! And of course I have used some of them on today's project:

 (click on image for enlarged view)

This time I used some pieces from the fab "Arrows Grab Bag"


alongside a lovely fence piece cut from greyboard.

Other materials used on my project:

-various acrylic paints (any brand will do.

I used DecoArt Traditions (T), Americana (A) and media fluid acrylics (mfa): Raw Umber (T), Medium White (T), Opaque White (T), Mulberry (A), Quinadridone Red (mfa), Diarylide Yellow (mfa).
 If you don't have the exact brands any other tones close to them will do as well.

- Art Podge or DecoArt matte Decou-Page
- DecoArt media white Crackle Paint
- a piece of white foam board (or thick corrugated card)
- paper flowers in reds, browns and pink
- white Sharpie
- markers (I used the Faber Castell PITT artist pens): black, blue, green, pink, red
- sticky foam pads
- sharp knife and metal ruler
- cutting mat
- old book pages
- soft brush
- designer papers
- various washi tapes
- wood button
- label maker

If you browse Lisa's fab store you will find a great variety to choose from!


Here we go!


(click images for larger view)


To me the arrows also look like tiny house shapes. I cut some of the arrows that point into two directions into two pieces to get more house shapes for my project (image 1). 

The smaller piece of the greyboard fence set was cut in half as I needed two lower fences for my tiny houses (image 2).

I cut a large piece of white foamboard to size (so the four house shapes and their surroundings fit in easily) and cut four frame pieces from the left overs (image 3). 

I glued the house shapes onto some old dictionary pages using Art Podge/matte Decou-Page. Once dry I cut off any excess (image 4).


Then:


I glued the frame onto the back panel and covered the whole frame with old dictionary scraps using a soft brush and Art Podge (image 1).

While that was set aside to dry I painted my fence pieces with Raw Umber. Once that was dry I applied a coat of white DecoArt Crackle Paint (image 2) (once the crackle process starts the dark brown colour from underneath will show through and make the cracks visible)
Note: most crackle media do not work on unsealed, porous surfaces. Any acrylic paint or glue or sealant will do the job though. 


The dry frame was toned down using a wash of "Medium White" acrylic paint (image 3)

The houses were given a coat of diluted "Opaque White" (image 4).


Next:


The outer frame was given some strokes of the diluted Opaque White too to highlight it (image 1).

Then I browsed my designer papers for various blue and green sheets (needed for the clowds and hills). (image 2)

First I determined the exact places for my houses to go in - then I tore to size some clowds and the four hills. It is important to create overlaps as this will create a lot of depth! (image 3)

The clowds were collaged onto the background using the matte Decou-Page/Art Podge. Then I dabbed some Raw Umber acrylic paint around the edges of the frame using my fingertips (don't be afraid to leave visible fingerprints - this is what we are aiming for ;) (image 4)


Continue with:


Browse your paper flower stash for smaller flowers in reds, browns and pinks. Try to find at least two different tones of each) (image 1)

Cut the flowers leaves off the centres (image 2). The single leaves will be used as roof tiles!

Glue your roof tiles onto the painted houses starting from the bottom of the roofs and overlapping each leaf! Let each upper row of leaves overlap the lower row (image 3).

Paint your houses, embellish them with varios washi tapes, then doodle on the windows and doors. Also add some texture to single roof tiles to add more detail (image 4 and image below).


Almost there:


Before you fix the houses to your background, add some birds to the sky (either by using a washi tape like I did...or by stamping or collageing them on) (image 1).

Glue your houses to the background using layers of sticky foam pads. I glued two of my houses on flat and the other two needed a stack of sticky foam pads so they could overlap the other houses. Then I added the torn to size hills the same way. (image 2)

Add the crackled fences. If you want to have more of your doodling on the houses showing through, just add a higher stack of sticky foam pads to the back of the fences so there will be more space between the house and the fence. (image 3)

For a finishing touch add an image title using a label maker (image 4 and image below).


For my sun I painted a wood button with bright orange acrylic paint and glued it to the background. Then I painted some sketchy orange and black circles around it to make it blend in. (image below).


Some more close ups:


The finished shadowbox frame:


I hope you like it!

And just in case you haven't already joined in: there are still three more days left to play along and enter the actual TCP Mother's Day Challenge (which is an anything goes this time! Yay!)

And the winners and Top3 from the "Film" challenge have been announced too. Find out about them HERE.

Hugs and happy crafting,
Claudia
xxx


Wednesday, 18 February 2015

VonPappe Wednesday #5

Servus and welcome back to "VonPappe Wednesday!

And you're just in time to also check out the brand new challenge "Film (Inspired)" that started this Sunday and get inspired by the brilliant makes of the fab TCP team (over HERE)!

Today I have a rather short (and easy to follow) tutorial for you that will show you how to create a Steampunk door sign that will tell visitors to "keep out". (My son has just reached that certain age where kids need to keep their annoyingly protective (and curious) parents from uninvitedly entering their rooms...lol...so that was my main source of inspiration this time).


Lisa sells some really fab Steampunk chipboard and MDF wood cut pieces and I chose to use some of these for my door sign:


As you can see I have used pieces from the tiny houses and arrows and the "Mixed Bag of Gears" grab bags this time alongside her wonderful chipboard panel with the gears and cogs frame.

I love the MDF Laser Cuts because they are heavenly bulky and lightweighed at the same time! So when you "steam them up" they look really massive and heavy - like real metal pieces.

For the door sign I also used:

- DecoArt Metallic Lustre "Copper Kettle"
- DecoArt Traditions acrylic paint "Raw Umber"
- DecoArt media fluid acrylic "Quinacridone Gold"
- DecoArt Decou-Page Satin
- some soft wire and pliers
- a stipple brush and a small soft paint brush
- a collection of various embellishments (metal and resin)
- a texture stamp (I used one of Andy Skinner's but any stamp that creates a scratched or splattered pattern will do as well)
- black archival stamping ink
- alpha parts or any other three dimensional letters

So you see: the list is rather short (and you can buy most of what you need for it with That Craft Place - either with the Online Store or the  TCP facebook group...or in Lisa's lovely bricks and mortar shop of course)  - which means: this is a really quickly done project. I promise! ;)


1. Start with adhering your alpha parts to the panel once you are content with the arrangement of all the MDF pieces and the "keep out". Then cover the whole panel and the letters by stippling a thick layer of Raw Umber acrylic paint all over them. Stippling will create a rough texture once the paint has dried - and we will need that!


As you can see we will need a second layer of paint to make sure we have good coverage! But while the first layer dries move on to step 2...


2. Stamp a "rust" (or scratch or splatter) pattern onto the (untreated) MDF gears and arrows with black archival (!) stamping ink. Let dry.


In the meantime stipple on the second layer of Raw Umber before you move on to Step3!

3. Paint a thin layer of Quinacridone Gold over the dried stamped texture with a soft brush. This is the quickest way of creating a rusted surface look with minimum mess! Thanks to Mr. Andy Skinner!


4. And there's another brilliant invention I have seen Mr. Skinner demo at CHA this year: rusted looking nails heads made from card! It's fantastically easy: stamp some texture in black archival ink (as you did with the gears and arrows) onto some heavy card, paint them with the Quin Gold and punch out little circles once all is dry. Make sure you colour the circles' edges with a hint of black paint - voila: your nails heads are done!


5. Glue all your pieces in place and let dry. Then get out the Metallic Lustre (or any other gilding wax with a copper sheen) and rub it on with your fingertip. You will find that the stippled on paint texture will start to show and create the impression of a wonderfully weathered metal surface!


6. Cover the "keep out" with the Metallic Lustre too! Then browse your embellies stash to find some metal parts that fit your design and glue them to your door sign.


7. I also found a resin eye that needed a little alcohol inks treatment to help it blend in better....but that is just optional. You can embellish your door sign with whatever stuff you like - it's all up to you).


8. Cut to size a piece of soft black wire using pliers and attach it to your panel. I rubbed some Copper Kettle Metallic Lustre on the wire too to make it blend in.


As the wire is soft you can tweak it with your fingers until you are content with the loop's shape.


And that's it! You're done! Easy peasy - just as I had promised! Right? ;)


So I hope I could show you that it doesn't always take ages and loads of steps and different media to create something cool steampunk looking! So maybe I could even manage to lure some of you into steampunk as well - I would be very happy about that as steampunk can be so much fun! Of course the demonstrated technqiues can be adapted to any kind of style...but rusty looking surfaces done that easily might well open the gates to crafters who haven't dared approach that style by now. Who knows!

I leave you with some more images and close ups and say a massive "thank you for stopping by!"


Hugs and happy crafting!

And have fun shopping with That Craft Place and crafting with their fab stuff!
And make sure you don't miss their fun challenges either! There's such a brilliant bunch of talented ladies over there constantly sharing awesome inspiration! And I am so proud of being able to work alongside all of them!

Claudia 
xxx


01 09 10